| Simplified Stair Building With Landings - Sample Pages |
|
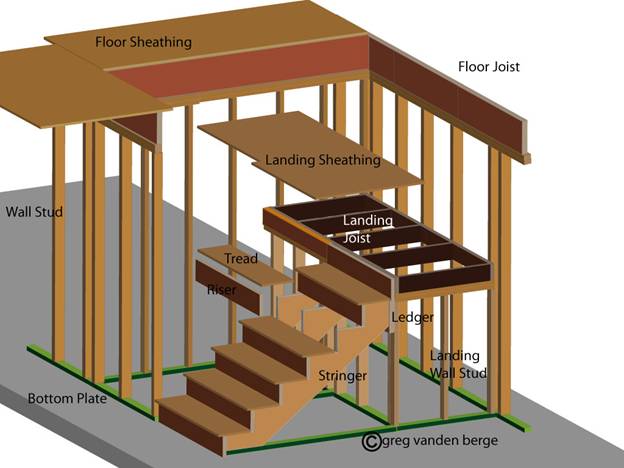
Stair Parts
This illustration should give you a general idea about what parts of the stairs go where and what they're called. If you need more information about certain parts of a stairway, then feel free to visit our online glossary.
http://stairs4u.com/glossary.htm
Page 5
In the illustration above, we have four different measurements. Measurement A: Represents the width of the upper stairway. Measurement B: Represents the width of the landing. Measurement C: Represents the width of the lower stairway. Measurement D: Represents the run or length of the upper stairway. Before we layout our stair stringer's, we need to have a general understanding of what these measurements actually represent.
Page 15
Building The Stairs
In this chapter I'm going to use three-dimensional illustrations to provide you with a better example and crystal clear illustrations of how this particular stairway can be built.
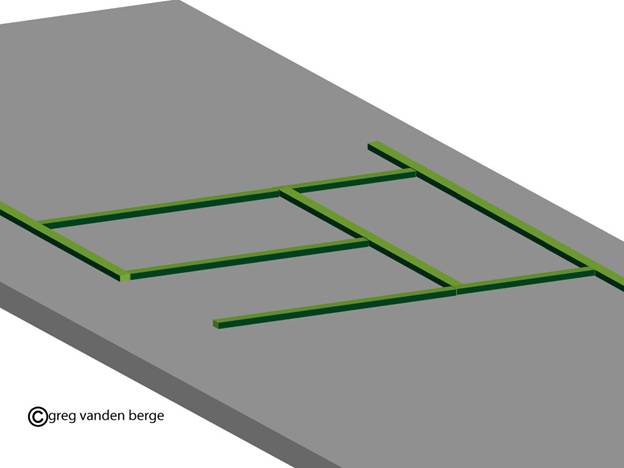
Step 1: After you marked out and positioned each wall perfectly, you can cut the bottom plates and place them exactly where they need to go.
I'm not going to go into detail on how these framing plates need to be attached to the building foundation, because that would require another book. Feel free to attach bottom wall plates using standard construction methods.
Page 22
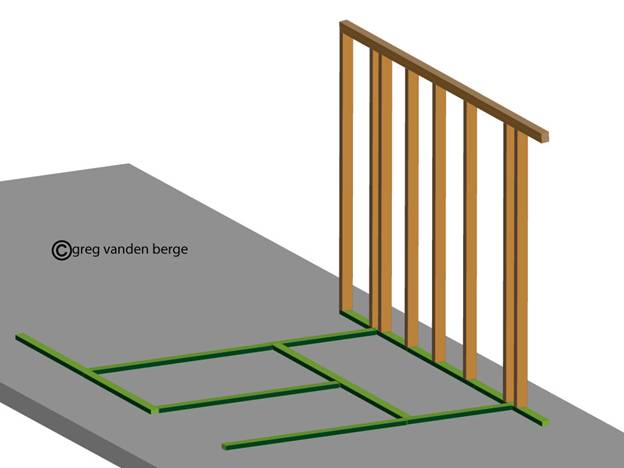
Step 2: Frame the back wall, using precut wall studs. A standard wall stud for an 8 foot ceiling is 92 1/4 inches. A standard wall stud for a 9 foot ceiling is 104 1/4 inches. We will be using 88 1/4 inch wall studs for our example and this would not be recommended nor is it common construction practice. It just works well with our 7 1/2 inch riser measurement.
Page 23
Step 14: In the next step we will attach the 2 x 6 landing ledger to the wall. You can use a level to mark the bottom of the ledger, on either one of the corner wall studs or simply measure the height of the landing wall and transfer this measurement to the back corner.
It wouldn't be a bad idea to drive one nail through the ledger, into one of the wall studs and then place a level on top of the ledger, to make sure it isn't out of level. If it is, then feel free to make the necessary adjustments.
It also wouldn't be a bad idea to check the top of the landing walls, in order to see if everything is level. It's a lot easier to make adjustments throughout any part of the stair building process, if you haven't nailed everything off.
Page 36
Step 20: In the next step you will position the center stair stringer, exactly in the middle of the two outer stringers. However, you will not be nailing it off completely, until you have made any necessary adjustments.
Simply attach the center stair stringer with one nail through the stringer and into the ledger, just in case it needs to be repositioned.
http://www.pic.stairs4u.com/splitlevel/nailed_and_adjusted_stringers.htm
Page 42
Step 32: In the next step you can nail the treads on, starting from the bottom and working your way up to the top.
http://www.pic.stairs4u.com/splitlevel/finished_bottom_stairway.htm
For additional holding power, you can use glue or other constructions adhesives.
http://www.pic.stairs4u.com/splitlevel/construction_adhesive.htm
Page 59
Landing Heights
In this chapter I'm going to provide you with a few different examples of stairs with platforms. Realistically, only the locations of the landings in the illustrations below will have changed, but the process for constructing practically any stairway with a landing will remain the same as those in the previous chapter. In the illustration above we have three steps leading to our first landing and then another six to the upper floor. The illustration above provides you with an excellent view of where the landing and upper floor will be positioned, while laying out your stair stringer.
Again, the stair building process works best when you can imagine every step of the construction process perfectly in your mind.
Page 65
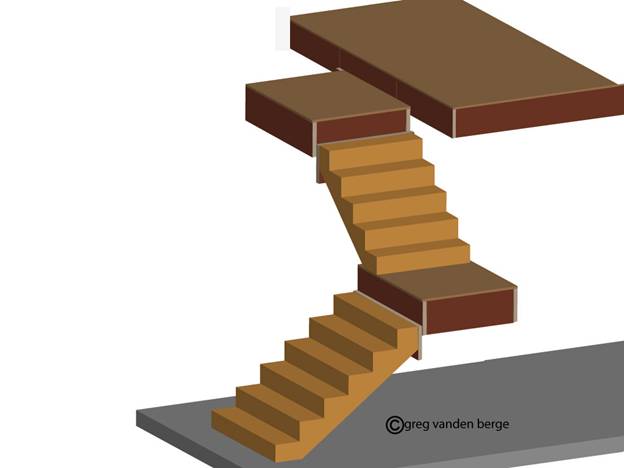
In this illustration I rotated the upper stairway 90° so if you were walking up the lower stairway, you would turn to your left at a 90° angle and continue walking up to the last landing, before turning right and taking your last step, on to the upper floor.
The previous illustrations and examples of landing height measurements can be applied to practically every set of stairs with a landing, no matter which way they turn.
Page 78
Here's what the stairway would look like if we couldn't move the wall. In the past I've been forced to build stairs like this, because we couldn't move the wall.
This is where stair building gets tricky. You obviously wouldn't be able to move this wall if it was a major structural component of the building. The wall might not be able to move because it's holding something up, a structural shear wall or moved because it would create a building code violation.
Problems like these can be solved during the design phase, but will be practically impossible to solve after the building plans have been finalized. Building the perfect stairway starts with its design.
It doesn't matter whether you're building a deck, porch or new home, if the designer, engineer and builders don't have a clue about these problems, they could turn into the builder's worst nightmare.
Page 87
Stair Building Glossary
Visit our online glossary for more information or if there’s a word we might have missed at http://stairs4u.com/glossary.htm
Anchor Bolts – Bolts that are embedded in the building foundation and used to attach building materials, like lumber to the foundation. Most anchor bolts are L-shaped and between 1/2 and 3/4" in diameter.
Balusters - These are vertical handrail components used to protect people from falling through the handrail or guard rail system. Balusters can be made from wood, metal and plastic.
Building Codes - A system of rules and regulations to create safer buildings. Most cities or counties throughout the United States regulate building codes through their building departments using building inspectors and other city officials.
Building Foundation - This is usually what a house or building rests upon. Foundations are usually built using concrete, block, cement or brick.
Building Hardware - Any nails, screws, nuts, bolts, hangers, connectors or other metal brackets used to connect one building component to another.
Cap - A piece of finish building material
that usually runs at an angle, vertical or horizontal. Most solid
drywall guard rail
Cedar – Is a recommended wood used for exterior building projects like decks and stairs. Cedar can also be used on the interior of a house. Also see Redwood.
Ceiling - The overhead surface of a room, hallway and stairway. It's important to have enough distance between the ceiling and your head, for anyone who’ll be walking up and down the stairs.
Construction Standard Lumber - Wood that is used primarily for framing and building homes. On the west coast of the United States they use Douglas Fir and on the East Coast they often use Southern Pine.
Page 149
|
| Back To Stair Building Books / Simplified Stair Building With Landings |