How To Layout Bottom of Stair Stringer

In this section you're going to learn the basics, but
keep in mind that adjustments and further calculations will need to be
made.
For example, you will need to deduct certain measurements off of the
bottom of the stair stringer, while laying it out, in order to make the
first step in the stairway, the same riser height as the rest of the
steps in the stairway..
This method also won't apply to every stairway, so keep this in mind.
More on this later.

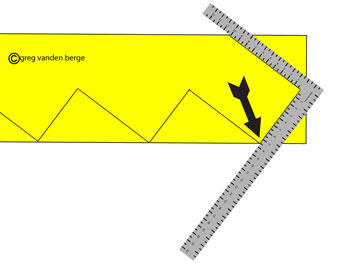
The black arrow in the illustration above is pointing
to the tread width measurement mark on the framing square.
For our example it is 10 inches.
After you have lined up the width of the stair tread or step, with the
second riser line and double checked all of your measurements, feel free
to mark the first riser.
Then you're going to use the first riser line, to line up the framing
square to mark the bottom of the stair stringer.

The arrow in the illustration above is pointing to the riser measurement mark on the framing square. Make sure you have made the necessary calculations and adjustments, for any additional material that will be added to the stair steps and flooring, before marking or cutting the stair stringer.

After you have the framing square in the exact location, mark the bottom of the stair stringer.

When you're all done you should end up with something that looks like the illustration above. Click on links below for more information about how to layout the bottom of stair stringers for other applications.
- How To Calculate And Adjust For First Step
- How To Layout Bottom of Stringer For Concrete
- How To Layout Bottom of Stringer For Wood Framed Floors
- How To Layout Bottom of Stringer For Landing
- How To Layout Bottom of Stringer With Building Hardware
Next - How To Layout Top of Stair Stringer
Back To How To Do It Yourself / How To Figure And Calculate Stair Stringers


